
Your fridge and freezer work continuously on a 24/7 basis for 365 days a year and, when compared to other electrical appliances, they are one of the most reliable in your house.
However, this means that simple problems are often neglected, simply because it only appears to function correctly. Unfortunately what may appear to be simply cosmetic damage – such as a fault with the door seal – can significantly add to your electricity bill over the course of a year. The reason for this is that even an apparently small area of damage to the door seal leads to warm, moist air from the kitchen continuously entering the interior of the cabinet. This air quickly condenses and freezes resulting in excessive ice build-up, even in frost-free models. This in turn leads to the compressor (which creates the cooling effect within the fridge) running for much longer than normal which increases the running cost. In the long term it can also lead to premature thermostat and compressor failure due to extended operation of these critical components.
Checking a fridge seal
Splitting and cracking of the door seal are fairly obvious faults to recognise. However, a seal may appear to be in good order when in reality a small gap may be allowing warm moist air to enter the cabinet. You can check the effectiveness of your fridge door seal using this simple method.
1) With the door closed, carefully inspect the whole perimeter of the seal looking for obvious flat spots (gaps between the seal and the metal casing of the cabinet).
2) Take a piece of paper the size of a £5 note (or a £5 note itself), and wedge it between the door seal and the metal face of the cabinet as you close the fridge door.
3) Hold the paper/note firmly and slowly pull it out from between the seal and cabinet face. If the seal is working correctly you should feel tension as the paper/note slides out. Repeat this simple test around the whole of the seal’s surface. If at any point the paper/note is not held by the seal and slides easily or freely with little or no resistance this indicates that the seal is failing at that point.
4) Cracks and splits in a door seal may be obvious even with the door closed. However, some may not be so visible and you will also need to check the whole of the inner edge of the seal closely. With the door open check the whole of the seal around the door by slightly extending the seal with your fingers whilst checking for any damage within the folds of the seal.
If a problem is found by these simple checks you need to decide if the seal can be replaced as a separate item or not. You can do this with the door open and easing/slightly lifting a fairly large section of the door seal in order to view the outer edge of the doors plastic inner lining which is normally covered by the seal. You are looking for hidden screws or similar removable fixings holding both the inner plastic door liner and seal in position. Check the whole seal in this way. If you find screws then it is likely that a replacement seal will be available as a spare part. If the part is not available for any reason you can always opt for using a universal door seal kit which should come with its own specific fitting instructions.
If there are no obvious visible fixings check to see if the seal is secured by other means or contact the manufacturer/spares provider to find out whether the seal is available as a separate item or if the door is only available as a complete unit.
Removing and replacing a door seal
If the door's inner plastic liner and seal are secured by hidden screws or fixings these will need to be removed first. Lightly mark their position prior to disturbing them to ensure they are refitted correctly. Also make notes of the length and position of the various screws and fixings you encounter during the removal procedure to ensure that all fixings are refitted back into their original positions.
Removing the door from the appliance to carry out seal renewal is not recommended as some appliances have spring loaded doors, complicated hinges and/or electrical connections to components within the door cavity.
Repairing a damaged door seal
If a seal is not available for your fridge and you don’t want to attempt to fit a universal seal kit there is the option of repairing the damaged part of the seal.
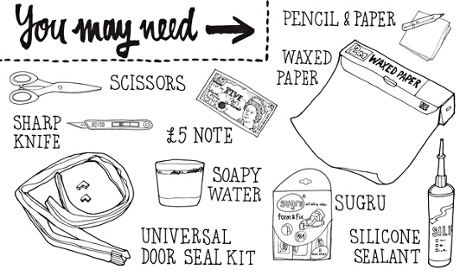
You will need:
5cm-strip of waxed paper
Small tube of silicone sealant
Sharp knife
1) Firstly ensure that the damaged seal is clean, dry and free from grease.
2) Retain as much of the old seal and internal magnetic strip as possible. (The magnetic strip is usually a brown flexible strip hidden within the circumference of the seal which acts to pull the face of the seal on to the metal casing of the cabinet.)
3) Apply an even layer of silicone sealant to the damaged area ensuring that it penetrates any gaps or cavities in the seal.
4) Carefully cover the silicone with the strip of waxed paper allowing it to overlap the undamaged section of seal at either end. Trim the edges of the paper so that it can be folded to conform to the original shape of the seal.
5) When the sealant and paper are in the correct position carefully close the door, trapping the paper between the seal and the metal body of the appliance. You will need to leave it in place undisturbed for at least 8 hours to allow the sealant to set.
6) When satisfied that the sealant has set sufficiently, gently remove the waxed paper to expose what should be a new section of seal. If required trim any surplus sealant with a sharp knife.
Repair broken shelves and cracked drawers
Sugru is a self-setting solution that moulds like play dough, sticks to almost anything and turns into a strong, flexible rubber. It will work for fixing components within your fridge because it’s cold-proof (resistant to -60C) and sticks well to the plastics used in fridges.
You will need:
1-2 mini packs of Sugru
Soapy water
Scissors
1) For all breaks, make sure the surface is clean, dry and free from grease.
2) If you have broken the shelf of your fridge, press a sausage of Sugru on to the edge of the break. You can mould the Sugru into the appropriate shape so that the shelf will fit into the grooves built into the sidewall of the fridge.
3) If you are repairing a cracked drawer, roll the Sugru into a sausage twice the length of the crack and spread it over both the front and back of the break.
4) Press the Sugru down on all sides and smooth the surface by rolling your finger over the Sugru and by wiping soapy water over it.
5) Leave it to dry for at least 24 hours.
Graham Dixon is author of The Washing Machine Manual (Haynes Home and Garden). Jane ní Dhulchaointigh is the inventor of Sugru.
Want to know how to mend a leather sofa, scratched wooden furniture, a slow computer and more? Click here.
You can find more of Emma McGowan's work on her website.
Interested in finding out more about how you can live better? Take a look at this month's Live Better challenge here.
The Live Better Challenge is funded by Unilever; its focus is sustainable living. All content is editorially independent except for pieces labelled advertisement feature. Find out more here.
